We can easily make our “dumb” infrared-controlled devices smart with a cheap microcontroller and amazing open-source software. A WiFi microcontroller and an IR transmitter allows us to integrate these devices into a smart home system and let automation rules control them.
There are several devices in a home with IR remotes:
- Dumb TV
- Amplifier, active speakers
- A/C unit
- Air purifier, fan
- Light strips
In my living room, I have a microcontroller with two IR transmitters:
- one points to the TV: this controls my dumb TV and my active speakers
- another transmitter pointing to the AC unit
Things you will need
- ESP8266 or ESP32 microcontroller: choose any model you prefer, the IR transmitter only requires a single GPIO pin. I recommend the Wemos D1 mini, as this can be powered through a micro USB port and has lots of GPIO pins despite its small size
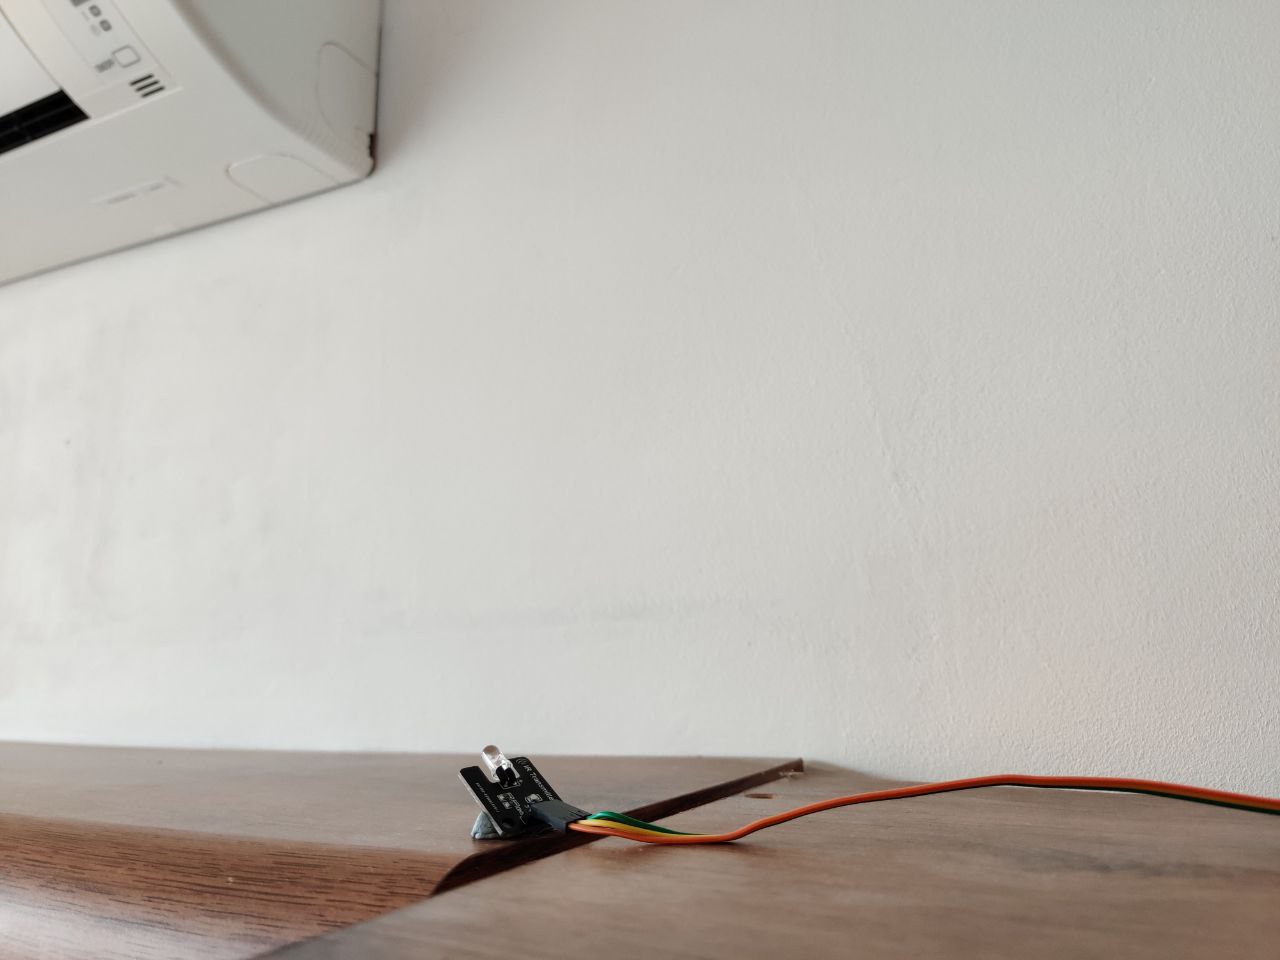
- IR transmitter: you can buy an entire board or a D1 mini shield from Aliexpress. Make sure to check the maximum emission distance of the IR diode if you plan to place the transmitter far away from the receiver device
- IR receiver: it’s not necessary to have a receiver too, but it’s useful when setting up your system. Instead of brute-forcing the IR commands of your device, we can point the existing remote at this receiver and let ESPHome decode the signal
- Jumper wires
- Software: ESPHome and Home Assistant. I’m also using Node–RED for my automations and MQTT for device-to-device communication, but you can achieve everything using only ESPHome and Home Assistant
Hardware setup
For those not familiar with ESPHome, it’s the easiest way to program ESP8266 and ESP32 microcontrollers. Instead of writing C code within the Arduino SDK, ESPHome generates code based on a YAML config file. It has a component system, so we only need to define the required components (an IR transmitter, for example) in the YAML file. ESPHome takes care of compiling and uploading code to the device. I recommend the Getting Started guide to get familiar with the project and set up your first device.
Setting up the remote receiver
Note: if you want to control an AC unit only, you can skip this section and head to the IR Remote Climate component docs. AC units use more complex protocols than other IR devices, and ESPHome has a dedicated component for those. We don’t need to decode each remote key command because the manufacturer-specific commands are supported by ESPHome directly.
First, we need to connect our IR receiver to the microcontroller and enable the Remote Receiver component:
remote_receiver:
  pin: D5
  dump: all
If we have set up everything correctly, pressing a button on the remote results in a line in ESPHome’s logs. If it’s a signal in one of the formats ESPHome can decode, then we can see the protocol-specific data as well. Write down the details of each keypress for later.
If protocol is known:
[D][remote.panasonic] Received Panasonic: address=0x4004 command=0x8140DFA2

Or raw output if it's not known yet
The values may fluctuate a bit, but as long as they're similar it's ok
[D][remote.raw] Received Raw: 4088, -1542, 1019, -510, 513, -1019, 510, -509, 511, -510, 1020,
[D][remote.raw]   -1020, 1022, -1019, 510, -509, 511, -510, 511, -509, 511, -510,
[D][remote.raw]   1020, -1019, 510, -511, 1020, -510, 512, -508, 510, -1020, 1022
Setting up the transmitter
It’s time to set up the IR transmitter and finally send some commands to the target device! I prefer keeping the IR receiver connected for debugging purposes, we can connect the transmitter to a different GPIO pin:
remote_receiver:
  pin: D5
  dump: all

remote_transmitter:
  pin: D6
  carrier_duty_percent: 50%
The Remote Transmitter component has transmit actions for each supported protocol and a raw transmission action as well. These actions take the protocol-specific data as arguments, so sending a volume up and a volume down command is the same action call with different arguments.
These so-called actions are part of ESPHome’s automation API, which defines triggers, conditions, and actions for on-device automations. The Remote Transmitter component defines some actions, but we also need triggers to…well…trigger these actions over WiFi. We can use MQTT triggers for this:
mqtt:
  broker: !secret mqtt_broker
  username: !secret mqtt_username
  password: !secret mqtt_password

  on_message:
    - topic: livingroom/ir_transmitter/preset/tv
      payload: volume_up
      then:
        - remote_transmitter.transmit_rc5:
            address: 0
            command: 16
    - topic: livingroom/ir_transmitter/preset/tv
      payload: volume_down
      then:
        - remote_transmitter.transmit_rc5:
            address: 0
            command: 17
Note: If you don’t want to set up an MQTT broker, user-defined services of the native API can be used for triggering the action. This way you can control your device from Home Assistant without setting up any other software.
As you can see in the config above, my MQTT topics define logical commands (volume_up) instead of protocol-specific data (address 0, command 16). I think it’s a good practice to have this abstraction on the device itself and expose only logical commands to the outside world.
Home Assistant UI
Let’s create our Home Assistant UI for controlling the devices. To create a button layout similar to the traditional remote, we can use a combination of horizontal and vertical stacks:
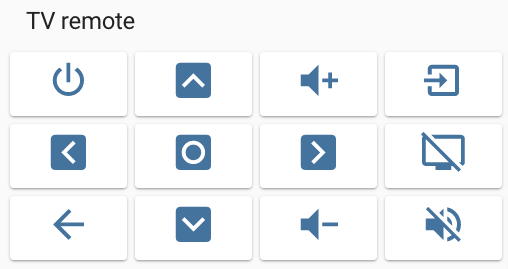
Each cell in the grid is an icon button with a hidden name. We define a tap action that is a service call to MQTT:
type: horizontal-stack
cards:
  - type: button
    icon: mdi:volume-plus
    show_icon: true
    show_name: false
    tap_action:
      action: call-service
      service: mqtt.publish
      service_data:
        topic: livingroom/ir_transmitter/preset/tv
        payload: volume_up
We can find icons for every button in the Material Design Icon Library.
Automations
Pressing the same remote buttons on a touchscreen is not really life-changing, but using a WiFi-connected remote controller opens up endless possibilities in automation, and this is where the real fun begins. Here are a few cool automation ideas for different IR-controlled devices:
Media (TV, amp, speakers):
- automatically turn on and off external speakers and change the input source to TV
- increase volume while a loud home appliance is running (robot vacuum, washing machine, air purifier)
- turn off the TV at the end of the day automatically
- adjust features of the TV based on some sensor data (for example, display brightness based on illuminance sensor)
AC, fan:
- turn off X minutes after everyone leaves home
- turn on before arriving home based on geolocation data
- switch to dry mode if indoor humidity is high
Next steps
Check out part two of this article for my more advanced usages of ESPHome.